
2024 Apps - Free Download & Official Reviews

Hide Connections on Facebook
 4.5
4.5
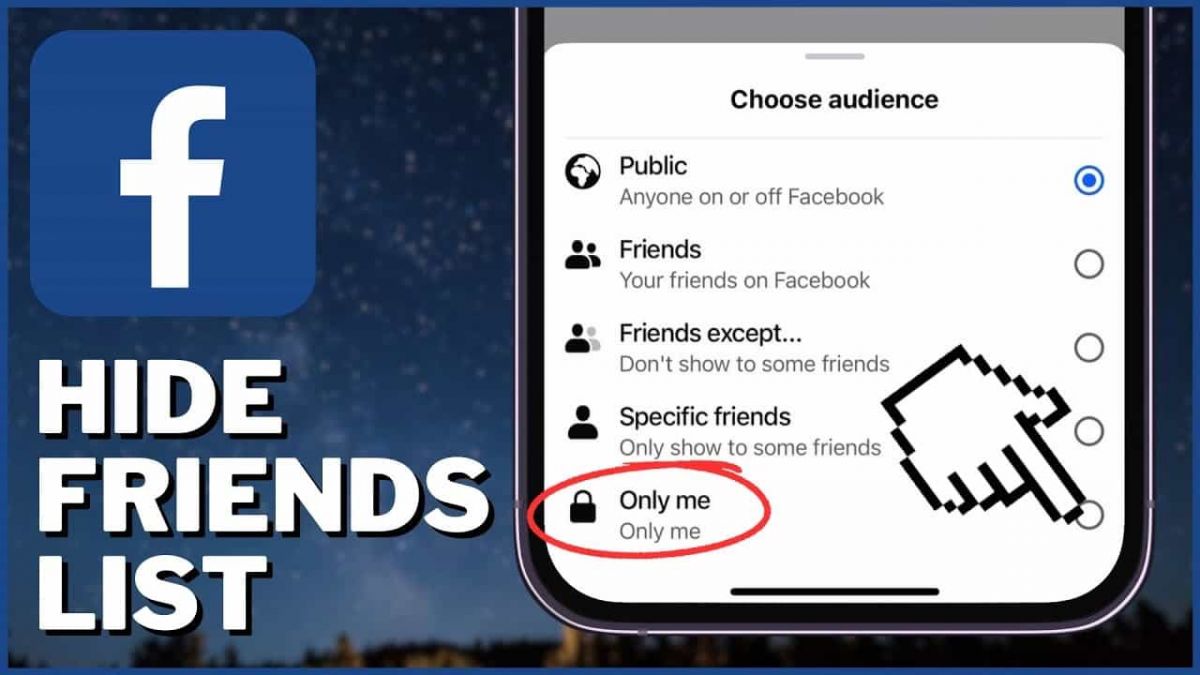
How to Hide Your Friends List1. Open Facebook in a web browser or mobile app.2. Click on your profile picture at the top right corner.3. Go to Settings & Privacy, then select Settings.4. In the left menu, click on Privacy settings.5. Find the section labeled “How people can find and contact you” and click on Edit next to “Who can see your friends list?”6. Choose from options such as Public, Friends, or set it to Only Me for complete privacy.

Install Temu for Free
4.4
Temu Mobile Installation1. For Android Devices:- Open the Google Play Store.- Type “Temu” in the search bar and press enter. Or you can simply go ahead from https://play.google.com/store/apps/details?id=com.einnovation.temu&hl=en_UShere, which will lead you to the destination directly.- Locate Temu and tap the “Install” icon.- Once installed, tap “Open” to launch the application.2. For iOS Devices:- Go to App Store.- Search for “Temu” in the search bar and press enter. Alternatively, you can simply visit https://apps.apple.com/us/app/temu-shop-like-a-billionaire/id1641486558here, which will direct you to the page.- Temu will appear; beside it, the “Get” button is present- tap on it to download.- After the download, tap the “Open” button to access it.Temu Installation on PC1. Open any browser and enter Temu’s official website https://www.temu.comfrom here.2. If there is any desktop version available, download that; otherwise, if the browser interface provides almost the same experience, then use that.3. If a desktop download is available, then follow on-screen instructions.


Create a Temu Account
4.4
How to Create Your Own Temu Account1. First things first, download and install Temu onto your device (or open its official website). Installation can be done through either the Google Play Store or the Apple App Store.2. Open the newly installed application to your home page and click the “Register” or “Create Account” button.3. Enter your full name, e-mail address, telephone number, and password. Ensure that all information is accurate.4. You may be requested to verify your identity with an SMS code or via email verification code. Just fill in the code that will be provided to you.5. Depending on the service, additional security set-ups such as a PIN or security questions will follow.6. Read Temu’s Terms of Service and the Privacy Policy, then check the box next to agreeing to them.7. Click on “Create Account” or “Register,” and you will have your account successfully created.

Place Your First Order on Temu
4.4
How to Complete the Purchase1. Log into the Open Temu account with the details of your account.2. You can browse through items on home page or search for products that can be used.3. You’ll want to click on the product you want, specify options like color, size, and quantity and click “Add to Cart.”4. To review items that have been added to the cart, tap on the top right corner on cart icon. The whole thing is fine, so make sure of that.5. If you confirm the accuracy of your correct shipping address.6. You have to choose your mode of preferred payment (such as from credit or debit card, etc), and you also need to fill the details accordingly.7. Before you click ‘Place Order’ make sure to check everything (that would include items, shipping address and payment method).

Return or Exchange Items on Temu
4.4
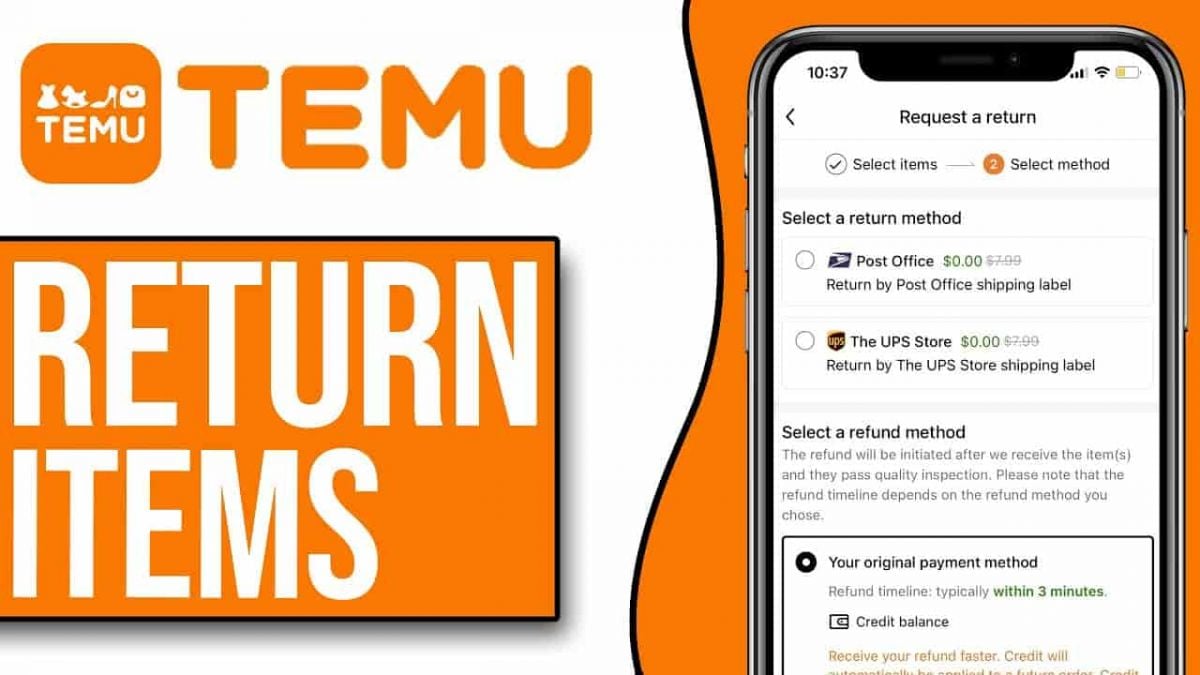
How to Return and Exchange on Temu1. Temu allows for free returns within 90 days of purchase. First, ensure your item qualifies for a return.2. Open Temu and log in with your account credentials.3. Go to your profile section and click on “Order History”; here you will search for the order which contains an item you want to return or exchange.4. Find the order in question, click inside it for detailed information, then select the item you want to return or exchange5. Fill in any required information about the reason for returning or exchanging this item in question (e.g., defective item).6. If desired, continue with the steps provided to print a return shipping label.7. Properly package the item, along with all possibly included accessories and documents, and ship it back using an appropriate courier service.8. After Temu receives your return, your refund or exchange will be processed and confirmed via email regarding the status of the request.

Keep Temu Always Up-to-Date
4.4
Update Methods1. Auto Updates: For both Android and iOS, select “App Updates” in your device settings to update your Temu application automatically whenever a newer version is released.2. Manual Update: Go to the Play Store for Android or the App Store for iOS, search for “Temu,” and if it says that an update is available, just tap on “Update”.3. Desktop Version: Since Temu is web-based on PC browsers, the updates are automatically done. You just have to refresh the page to experience the new features.


Download Zoom Easily
4.7
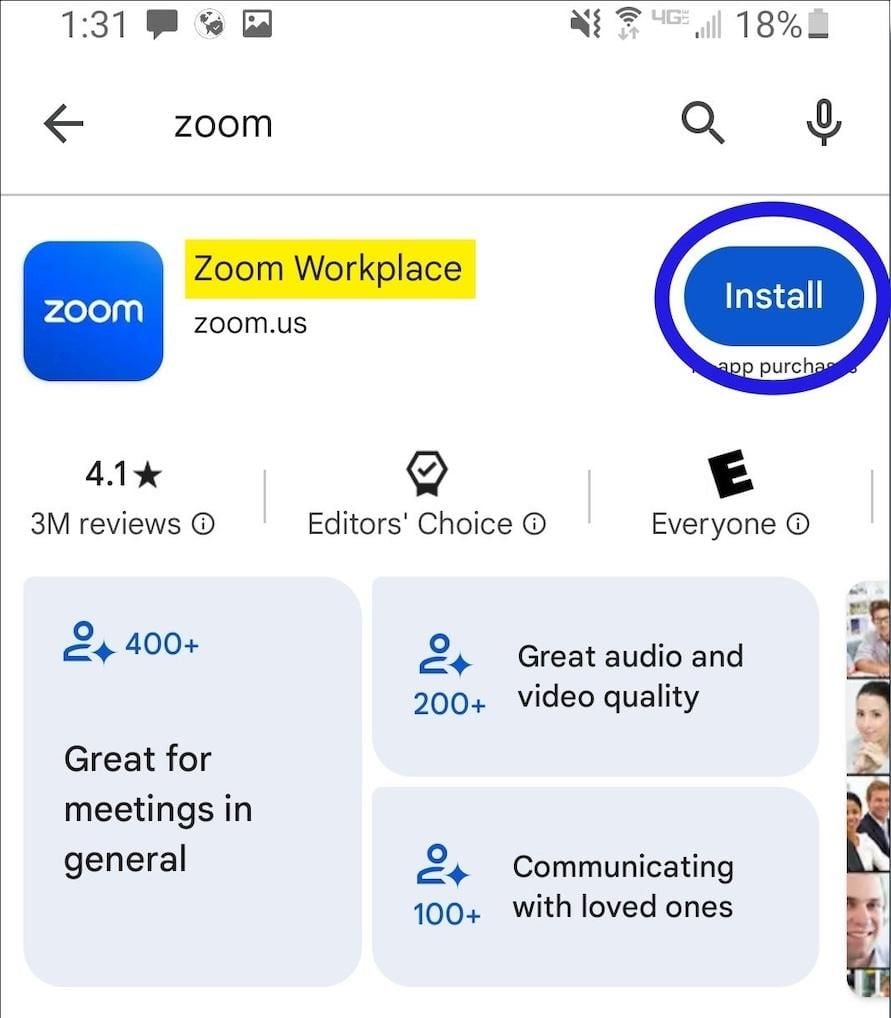
How to Install Zoom on Various DevicesFor Computer Systems (Windows and Mac):1. Open any browser and go to its official website herehttps://zoom.us/download.2. Click the blue “Download” button.3. Once downloaded, look for the installation file for Windows (ZoomInstaller.exe), or the .pkg file on Mac – in your downloads folder. Run the installer by double clicking, then follow the instruction on screen.4. If it requests any permissions, accept them through your operating system.For Mobile Android and iOS- Android:1. Open the Google Play Store.2. In the search box, type “Zoom Workplace” or install directly from here https://play.google.com/store/apps/details?id=us.zoom.videomeetings&hl=en_US.3. Click “Install” and wait for it to download.- iOS:1. Open the Apple App Store.2. Search for “Zoom Workplace”, or access it directly from here https://apps.apple.com/us/app/zoom-workplace/id546505307.3. Tap “Get” to download and install the application.Once installed, you can open Zoom and either log in or create an account.

Create Your Personal Account
4.7
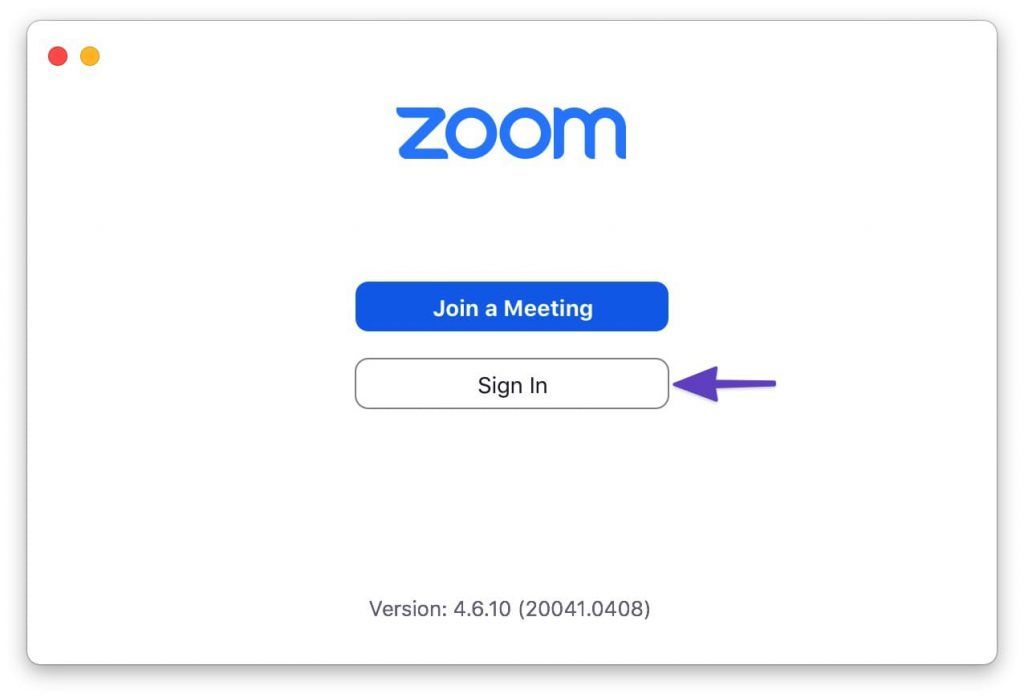
How to Create a Zoom Account1. Visit Zoom Website or App:- Open your browser and go to Zoom’s official signup page https://zoom.us/signup- If mobile, launch Zoom and press Sign In.2. Enter Your Information:- Enter your date of birth (at least 16 years old) and your email address.- There is an email confirmation, you click on the link in that email to activate and verify your account.- Then fill in first name, last name, and create a password after you confirm your email. Then click “Continue” to finish the process.- Alternatively, you can do the above verification using your Google account or Facebook account to register and login.3. Final Works- Sometimes you’re prompted to invite colleagues, or to start a test meeting, but you can skip these steps as well.- Tap the Zoom icon and tap the orange button: “Start Meeting Now”.

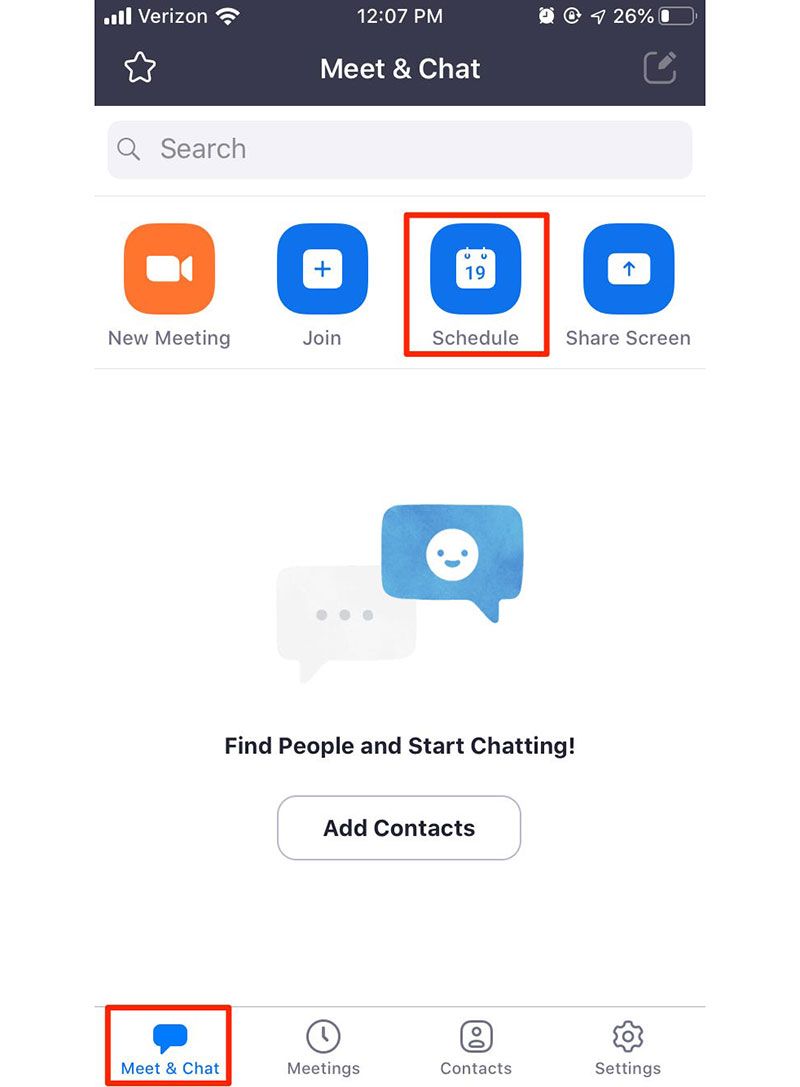
Schedule and Join a Zoom Meeting
4.7
How to Arrange and Attend Zoom’s MeetingArrange a Meeting:1. Sign into your Zoom account via its app or its official website.2. Click on “Schedule” from the home screen.3. Choose the date, time, duration, and any additional settings like requiring a password or enabling waiting rooms.4. After saving your settings, share the generated meeting link with participants via email or messaging apps.Attend a Meeting:1. Launch Zoom or visit the website.2. Click on “Join a Meeting.”3. Input the meeting ID provided by the host along with your display name.4. If required, enter the meeting password before clicking “Join.”5. Adjust your audio and video settings as necessary.

Ensure Privacy During Using Zoom
4.7
Privacy Tips1. Always enable an automatic ID and create passwords for your meetings to prevent unauthorized access.2. Enable waiting rooms lets hosts screen participants before they join the meeting, adding an extra layer of security.3. Set screen sharing options so that only hosts can share their screens unless permission is granted to others.4. Limit chat functions during meetings by allowing participants to chat only with hosts if necessary.5. Limit what information is publicly visible in your profile.